Case studies
The following typical use cases are described step-by-step below:
Example: Different place - different time
Another person (customer, contractual partner, etc.) is required to sign a PDF, but is not on site. You want to send the document to the person for signing.
1. Add document(s)
Click „Add document“ and choose the required PDF.
2. Place signature fields
Use the form editor and drag the signature field into the document to the desired position. You can then adjust the size and position. The default setting for each signature field is the handwritten advanced electronic signature (AES). An alternative way to sign is to enter a name using the keyboard. The signature method can be easily selected in the drop-down menu of the form field editor. When all fields are set, close the form editor by clicking “done” at the top right.Learn more about the different signature types here.
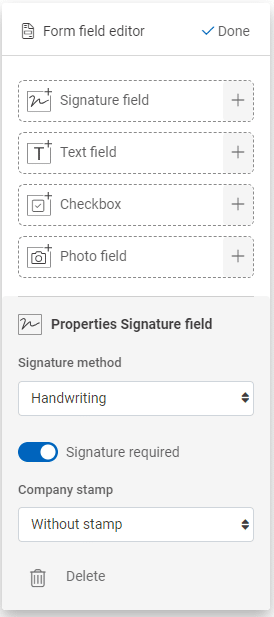
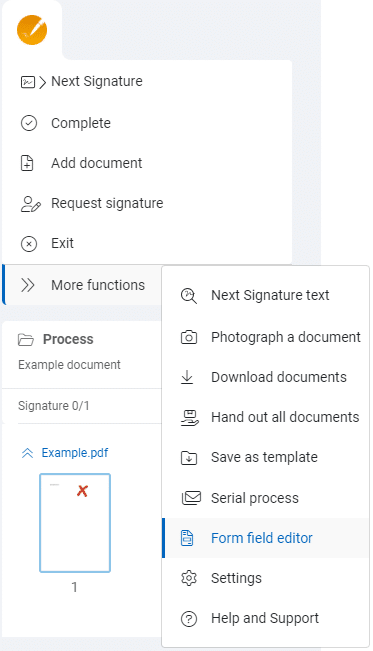
Please note: If the form editor does not open automatically, you can open it via the main menu at the top left under “More functions”.
3. Optional: Assign signature fields to persons
If several signature fields are available and are to be signed by different persons, they must be personalized. To do this, click on “Assign” below the respective signature field. The signatory can then only sign in the signature fields assigned to them.
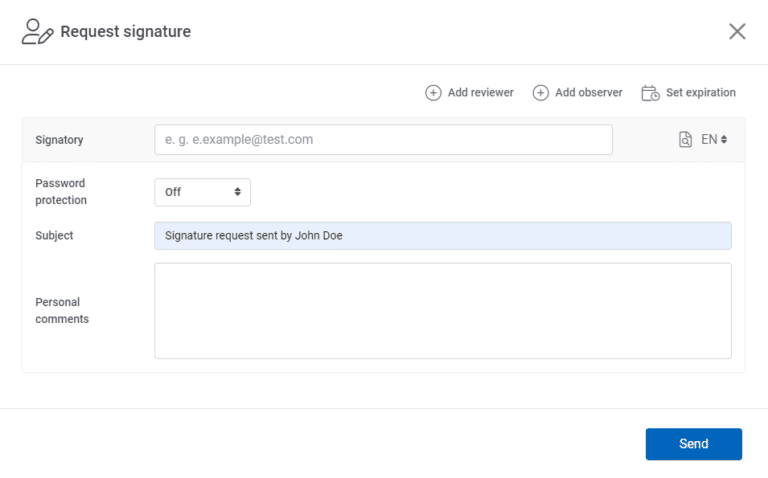
4. Send process for signature
To forward the process, select the command “Request signature”. By clicking “Send” the process is transferred to the recipient. Decide whether the signatory can open the document with or without a password. For sensitive documents, we recommend transmitting the password via another communication channel. For the second factor, you have the choice between SMS or an alternative email address. The password will not be sent until the signer clicks on the edit link. If necessary, you can adjust the language of the email.
Note: The signatory will receive all notifications in the language you choose. However, the user interface language in inSign is based on the language the user has set in their web browser.
Note: The signatory will receive all notifications in the language you choose. However, the user interface language in inSign is based on the language the user has set in their web browser.
5. Wait for completion
After the recipient has signed, you will be notified by e-mail.
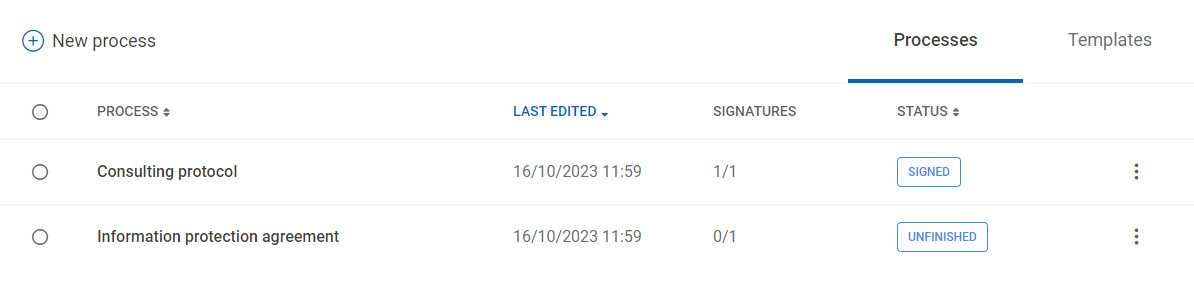
6. Check for completeness
You can find the process in the process management section (“Processes” button). Check the contents for completeness. If the document is not complete, send the document to the recipients again (“Request signature” button).
Note: The mandatory signatures (marked with *) are displayed in the “Signatures” column in the process manager and the optional signatures of the process are displayed behind them in parantheses.
Note: The mandatory signatures (marked with *) are displayed in the “Signatures” column in the process manager and the optional signatures of the process are displayed behind them in parantheses.
7. Complete the process
Users who have been provided with a document via “request signature” and have signed it will automatically receive the signed documents after the process has been completed. The download link is valid for 30 days.
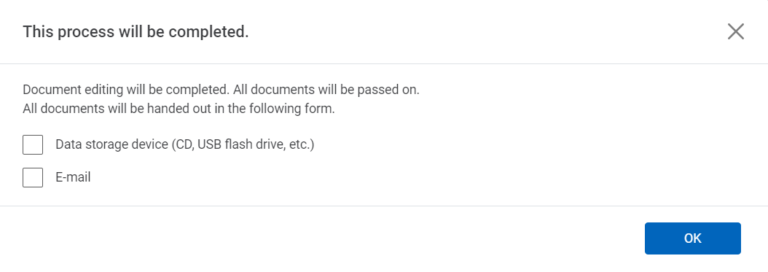
Click the “Complete” button. If required, the PDF can be handed out to additional persons in the following dialog.
8. Archiving
Your processes are automatically moved to an electronic archive after 30 days of inactivity. You can access the archive at any time. The corresponding menu item is located at the top right of the drop-down menu. In the archive, you can search for old processes and download them if required.
If you want to archive a process before the 30 days have elapsed, you can do so using this function. Simply click the “Archive now” button.
Note: After the end of the contract, the processes will be deleted from the archive. For this reason, we ask you to save your documents in time.
If you want to archive a process before the 30 days have elapsed, you can do so using this function. Simply click the “Archive now” button.
Note: After the end of the contract, the processes will be deleted from the archive. For this reason, we ask you to save your documents in time.
Example: Different place - same time
Sign live in a video conference/video consultation
1. Add document(s)
You are in a video conference with another person. Start inSign as usual, click the “Add document” button and select the desired PDF. Share your browser window (inSign) with your video partner.
2. Place signature fields
Use the form editor and drag the signature field into the document to the desired position. You can then adjust the size and position. The default setting for each signature field is the handwritten advanced electronic signature (AES). An alternative way to sign is to enter a name using the keyboard. The signature method can be easily selected in the drop-down menu of the form field editor. When all fields are set, close the form editor by clicking “done” at the top right.Learn more about the different signature types here.
Please note: If the form editor does not open automatically, you can open it via the main menu at the top left under “More functions”.
3. Sign
To sign, click on the signature field.
Handwritten electronic signature (Advanced electronic signature – AES):
You place your signature on a touch-sensitive screen (touchscreen, e.g. smartphone, tablet, etc.). If your device does not have a touchscreen, follow the instructions to redirect the signature to an appropriate device. This can be your smartphone or that of another person present, for example.
Name input via keyboard (Advanced electronic signature – AES):
No special touchscreen device is needed. Sign by typing your full name on the keyboard. The automatically generated audit report and the confirmed email/SMS number serve as proof.
No special touchscreen device is needed. Sign by typing your full name on the keyboard. The automatically generated audit report and the confirmed email/SMS number serve as proof.
Qualified certificate (Qualified electronic signature – QES):
inSign uses the eIDAS-certified and qualified trust service provider D-Trust with the remote signature solution sign-me for the QES. In order to be able to provide a qualified electronic signature, a one-time identification of the signatory is necessary. If the signatory does not yet have a sign-me account, he can perform an identification within the inSign workflow and thus create a sign-me account.
Identification can be performed via a video session with an identity document (such as an ID card, passport or electronic residence permit), via the eID of the German ID card or via the online banking account of a participating partner bank. The subsequent signature takes place via TAN, which the signatory receives via SMS.
The qualified electronic signature is embedded into the document as follows. In addition to the name, it contains a time stamp with the date and time.
See Adobe Reader DC for more information about signatures and certificates.
Important note: QES is not part of inSign 365 and must be licensed separately. If you are interested, please contact service@getinsign.de.
Important note: QES is not part of inSign 365 and must be licensed separately. If you are interested, please contact service@getinsign.de.
4. Complete the process
Click the “Complete” button. If required, the PDF can be handed out to additional persons in the following dialog.
5. Archiving
Your processes are automatically moved to an electronic archive after 30 days of inactivity. You can access the archive at any time. The corresponding menu item is located at the top right of the drop-down menu. In the archive, you can search for old processes and download them if required.
If you want to archive a process before the 30 days have elapsed, you can do so using this function. Simply click the “Archive now” button.
Note: After the end of the contract, the processes will be deleted from the archive. For this reason, we ask you to save your documents in time.
If you want to archive a process before the 30 days have elapsed, you can do so using this function. Simply click the “Archive now” button.
Note: After the end of the contract, the processes will be deleted from the archive. For this reason, we ask you to save your documents in time.
Example: Same place - Same time
Sign on site
1. Add document(s)
Click „Add document“ and choose the required PDF2. Place signature fields
Use the form editor and drag the signature field into the document to the desired position. You can then adjust the size and position. The default setting for each signature field is the handwritten advanced electronic signature (AES). An alternative way to sign is to enter a name using the keyboard. The signature method can be easily selected in the drop-down menu of the form field editor. When all fields are set, close the form editor by clicking “done” at the top right.Learn more about the different signature types here.
Please note: If the form editor does not open automatically, you can open it via the main menu at the top left under “More functions”.
3. Fill out
If your document contains form fields, please fill in all these fields first. Once you start signing, you will not be able to make any further changes. If you have to do so anyway, all signatures will be invalidated and removed from the document automatically.
4. Sign
To sign, click on the signature field.
Handwritten electronic signature (Advanced electronic signature – AES):
You place your signature on a touch-sensitive screen (touchscreen, e.g. smartphone, tablet, etc.). If your device does not have a touchscreen, follow the instructions to redirect the signature to an appropriate device. This can be your smartphone or that of another person present, for example.
Handwritten electronic signature (Advanced electronic signature – AES):
You place your signature on a touch-sensitive screen (touchscreen, e.g. smartphone, tablet, etc.). If your device does not have a touchscreen, follow the instructions to redirect the signature to an appropriate device. This can be your smartphone or that of another person present, for example.
Name input via keyboard (Advanced electronic signature – AES):
No special touchscreen device is needed. Sign by typing your full name on the keyboard. The automatically generated audit report and the confirmed email/SMS number serve as proof.
No special touchscreen device is needed. Sign by typing your full name on the keyboard. The automatically generated audit report and the confirmed email/SMS number serve as proof.
Qualified certificate (Qualified electronic signature – QES):
inSign uses the eIDAS-certified and qualified trust service provider D-Trust with the remote signature solution sign-me for the QES. In order to be able to provide a qualified electronic signature, a one-time identification of the signatory is necessary. If the signatory does not yet have a sign-me account, he can perform an identification within the inSign workflow and thus create a sign-me account.
Identification can be performed via a video session with an identity document (such as an ID card, passport or electronic residence permit), via the eID of the German ID card or via the online banking account of a participating partner bank. The subsequent signature takes place via TAN, which the signatory receives via SMS.
The qualified electronic signature is embedded into the document as follows. In addition to the name, it contains a time stamp with the date and time.
inSign uses the eIDAS-certified and qualified trust service provider D-Trust with the remote signature solution sign-me for the QES. In order to be able to provide a qualified electronic signature, a one-time identification of the signatory is necessary. If the signatory does not yet have a sign-me account, he can perform an identification within the inSign workflow and thus create a sign-me account.
Identification can be performed via a video session with an identity document (such as an ID card, passport or electronic residence permit), via the eID of the German ID card or via the online banking account of a participating partner bank. The subsequent signature takes place via TAN, which the signatory receives via SMS.
The qualified electronic signature is embedded into the document as follows. In addition to the name, it contains a time stamp with the date and time.
See Adobe Reader DC for more information about signatures and certificates.
Important note: QES is not part of inSign 365 and must be licensed separately. If you are interested, please contact service@getinsign.de.
Important note: QES is not part of inSign 365 and must be licensed separately. If you are interested, please contact service@getinsign.de.
5. Complete the process
Click the “Complete” button. If required, the PDF can be handed out to additional persons in the following dialog.
6. Archiving
Your processes are automatically moved to an electronic archive after 30 days of inactivity. You can access the archive at any time. The corresponding menu item is located at the top right of the drop-down menu. In the archive, you can search for old processes and download them if required.
If you want to archive a process before the 30 days have elapsed, you can do so using this function. Simply click the “Archive now” button.
Note: After the end of the contract, the processes will be deleted from the archive. For this reason, we ask you to save your documents in time.
If you want to archive a process before the 30 days have elapsed, you can do so using this function. Simply click the “Archive now” button.
Note: After the end of the contract, the processes will be deleted from the archive. For this reason, we ask you to save your documents in time.
Example: Self-Service
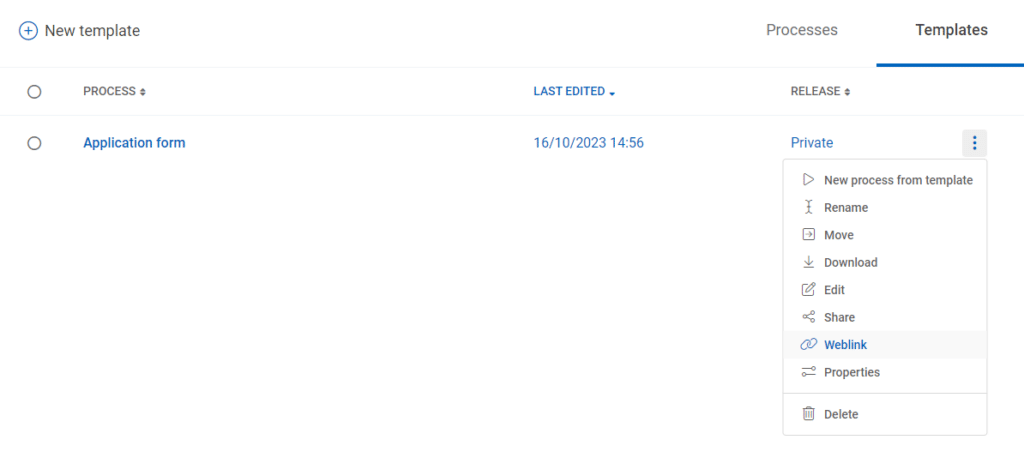
Static document to sign as permanent internet address (weblink)
If you want to provide a prepared PDF form for self-service, you can use the “Web Link” function in the template manager. You will receive a URL for a specific process that you can integrate into your website, an email, or a newsletter. People who click on this link automatically open the document and are prompted to complete and sign it. Once signed and completed by the user, you will receive a message to that effect and will automatically find the completed documents in your process manager.
Procedure:
Create a template with the necessary text and signature fields. In the template manager, click on the three-dots on the right of the respective process.
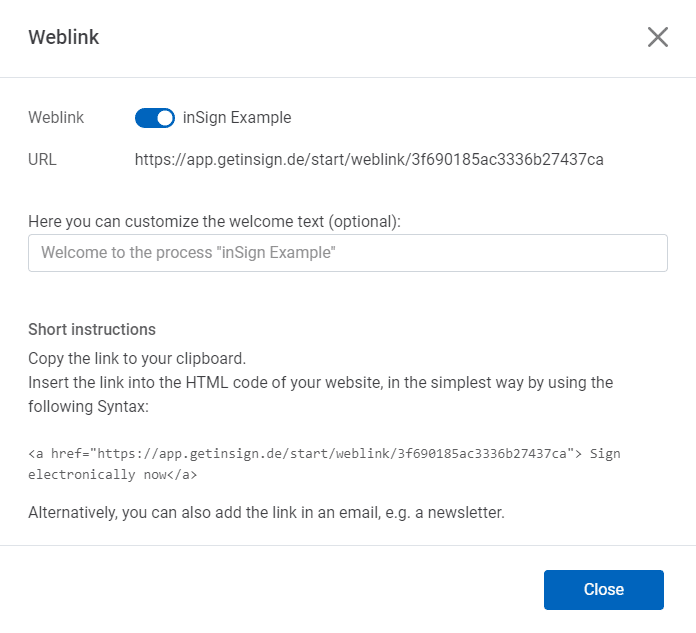
Activate the web link by using the slider on the top. Optionally, add an individual welcome text. If you do not enter anything, the text “Welcome to the management of your documents” appears when you call up the weblink. Copy the link to your clipboard and embed it anywhere you wish.
Using the expample of handwritten signature from a signatory’s perspective: